After some days of work I have finally added the picking mechanism to the project. Now the objects can react when mouse is moving, button is clicked, pressed or released.
It is based on picking and selection mechanism of OpenGL and doesn't affect the performance in a visible way.
I'm happy :)
Sunday, September 09, 2007


Tuesday, September 04, 2007
My first hack on WWJ
It is not any amazing thing but I want to show my first hack on WWJ code. Really this is the second hack, the first is my LayerSet class that allows create set of layers.
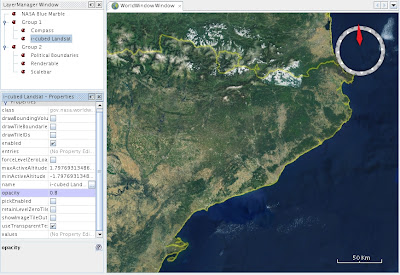
I have modified a bit the WWJ source code (in the SurfaceTileRenderer class) to allow some layers make use of the, until now not used, property opacity.
For example you can put a BMNGSurfaceLayer but you can change its opacity, or better said, you can invoke the setOpacity method but the opacity value is never used in the render process and thus the layer never changes its opacity.
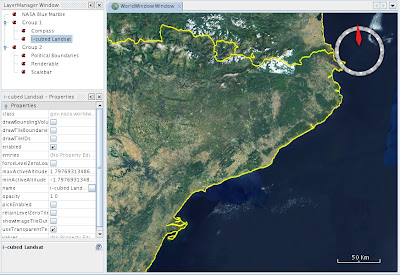
Take a look at this two screenshots. The first is a normal set of layers:
The second shows the CountryBoundariesLayer and the landsat layer with opacity changed:
Which is the secret?
You know some layers like BMNGSurfaceLayer, CountryBoundariesLayer and USGS* are based on BasicTiledImageLayer that extends the TiledImageLayer class. The later class uses the SurfaceTileRenderer to render the tiles.
In TiledImageLayer.draw() method change:
dc.getGeographicSurfaceTileRenderer().renderTiles(dc, this.currentTiles);
by
dc.getGeographicSurfaceTileRenderer().renderTiles(dc, this.currentTiles, this);
In SurfaceTileRenderer change:
public void renderTiles(DrawContext dc, Iterable tiles) {
by
public void renderTiles(DrawContext dc, Iterable tiles, AbstractLayer layer) {
and put this code (only the later 'if):
...
if (!dc.isPickingMode()) {
gl.glTexEnvi(GL.GL_TEXTURE_ENV, GL.GL_TEXTURE_ENV_MODE, GL.GL_REPLACE);
} else {
gl.glTexEnvf(GL.GL_TEXTURE_ENV, GL.GL_TEXTURE_ENV_MODE, GL.GL_COMBINE);
gl.glTexEnvf(GL.GL_TEXTURE_ENV, GL.GL_SRC0_RGB, GL.GL_PREVIOUS);
gl.glTexEnvf(GL.GL_TEXTURE_ENV, GL.GL_COMBINE_RGB, GL.GL_REPLACE);
}
if(layer!=null){
// Set transparency
gl.glTexEnvi(GL.GL_TEXTURE_ENV, GL.GL_TEXTURE_ENV_MODE, GL.GL_MODULATE);
gl.glColor4f(1, 1, 1, (float)layer.getOpacity());
}
...
Finally, create overload the method (to not affect other calls):
public void renderTiles(DrawContext dc, Iterable tiles) {
this.renderTiles(dc, tiles, null);
}
And thats all.
I have modified a bit the WWJ source code (in the SurfaceTileRenderer class) to allow some layers make use of the, until now not used, property opacity.
For example you can put a BMNGSurfaceLayer but you can change its opacity, or better said, you can invoke the setOpacity method but the opacity value is never used in the render process and thus the layer never changes its opacity.
Take a look at this two screenshots. The first is a normal set of layers:
The second shows the CountryBoundariesLayer and the landsat layer with opacity changed:
Which is the secret?
You know some layers like BMNGSurfaceLayer, CountryBoundariesLayer and USGS* are based on BasicTiledImageLayer that extends the TiledImageLayer class. The later class uses the SurfaceTileRenderer to render the tiles.
In TiledImageLayer.draw() method change:
dc.getGeographicSurfaceTileRenderer().renderTiles(dc, this.currentTiles);
by
dc.getGeographicSurfaceTileRenderer().renderTiles(dc, this.currentTiles, this);
In SurfaceTileRenderer change:
public void renderTiles(DrawContext dc, Iterable tiles) {
by
public void renderTiles(DrawContext dc, Iterable tiles, AbstractLayer layer) {
and put this code (only the later 'if):
...
if (!dc.isPickingMode()) {
gl.glTexEnvi(GL.GL_TEXTURE_ENV, GL.GL_TEXTURE_ENV_MODE, GL.GL_REPLACE);
} else {
gl.glTexEnvf(GL.GL_TEXTURE_ENV, GL.GL_TEXTURE_ENV_MODE, GL.GL_COMBINE);
gl.glTexEnvf(GL.GL_TEXTURE_ENV, GL.GL_SRC0_RGB, GL.GL_PREVIOUS);
gl.glTexEnvf(GL.GL_TEXTURE_ENV, GL.GL_COMBINE_RGB, GL.GL_REPLACE);
}
if(layer!=null){
// Set transparency
gl.glTexEnvi(GL.GL_TEXTURE_ENV, GL.GL_TEXTURE_ENV_MODE, GL.GL_MODULATE);
gl.glColor4f(1, 1, 1, (float)layer.getOpacity());
}
...
Finally, create overload the method (to not affect other calls):
public void renderTiles(DrawContext dc, Iterable tiles) {
this.renderTiles(dc, tiles, null);
}
And thats all.
Thursday, August 30, 2007
Returning...
Well, holidays are finished and we come back to the work. I didn't spend much time on the project but in my free time I did:
As a result of this third point I show you a screenshot:
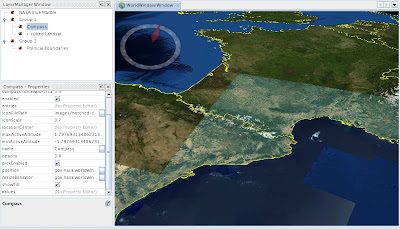
In there is no direct way to group layers, because this I have create a LayerSet class that can group layers.
The image shows the layers: BMNG, compass, landsat and finally country boundaries.
- improved the WMS wizard,
- added tilt rotation to the camera (similar to the WWJ), and also
- I have started to play the WWJ source code.
As a result of this third point I show you a screenshot:
In there is no direct way to group layers, because this I have create a LayerSet class that can group layers.
The image shows the layers: BMNG, compass, landsat and finally country boundaries.
Thursday, August 02, 2007
More improvements
Finally I'm on holidays. Also I have finished refactoring the core API to work with listeners (take a look at previous post).
Today I want to post about a couple of new user interface improvements I have made thanks to the previous work.
Now, when the user loads some data (image, shapefile or WMS layer) a progress bar is shown:

And once the data is loaded, depending if the data can or can't be loaded, the label in the layer explorer change its color to show the final state:

Today I want to post about a couple of new user interface improvements I have made thanks to the previous work.
Now, when the user loads some data (image, shapefile or WMS layer) a progress bar is shown:
And once the data is loaded, depending if the data can or can't be loaded, the label in the layer explorer change its color to show the final state:
Monday, July 23, 2007
Improving the model
Later I had worked on the logical model. Among other things Balloon has classes responsible to render graphic object and classes responsible to load data. I have just improved this using an event/listener mechanism.
Also I turn many java classes on JavaBeans, firing property change events and so on that helps to improve the client programming.
Finally I have divided the load process between synchronous (working in the update thread) and asynchronous process (working in a new thread). For example, to load WMS images the load process starts as a synchronous process, checks if the images is cached in the local disk and if so loads it, otherwise changes it to an asynchronous mode and loads data from the network server.
Probably it must be better to write some docs to help the future programmers of Balloon ;)
Also I turn many java classes on JavaBeans, firing property change events and so on that helps to improve the client programming.
Finally I have divided the load process between synchronous (working in the update thread) and asynchronous process (working in a new thread). For example, to load WMS images the load process starts as a synchronous process, checks if the images is cached in the local disk and if so loads it, otherwise changes it to an asynchronous mode and loads data from the network server.
Probably it must be better to write some docs to help the future programmers of Balloon ;)
Tuesday, July 10, 2007
WMS and cached images
This is a little demo which works with WMS layers with some cached images.
Other time, sorry by poor quality but (1) my video card is not so good and it is very dificult to execute and capture at the same time, and (2) youtube takes a lot of quality.
Other time, sorry by poor quality but (1) my video card is not so good and it is very dificult to execute and capture at the same time, and (2) youtube takes a lot of quality.
Saturday, July 07, 2007
Working with WMS server
Here is a demo video working with WMS server.
The first step in the wizard is to select the WMS server and the second step is to select the layer (or layers) you want to load.
The load speed depends both on the server and your network speed. As you can see in the vieo, my network speed is poor.
Also I want to note my computer is not so good to work with balloon at the same time we are recording screen. In addition YouTube lows the qualitit of the movie.
The first step in the wizard is to select the WMS server and the second step is to select the layer (or layers) you want to load.
The load speed depends both on the server and your network speed. As you can see in the vieo, my network speed is poor.
Also I want to note my computer is not so good to work with balloon at the same time we are recording screen. In addition YouTube lows the qualitit of the movie.
Wednesday, July 04, 2007
A couple of demo videos
Here are the first demo videos of the balloon in action.
Unfortunately I captured it only at 10 FPS to save space and also YouTube reduce it much more, making the false ilusion it is slow.
Here are a basic work with georeferenced images and the GUI layout:
Here you can see how easy is to work with shapefiles (with lat/lon data):
Unfortunately I captured it only at 10 FPS to save space and also YouTube reduce it much more, making the false ilusion it is slow.
Here are a basic work with georeferenced images and the GUI layout:
Here you can see how easy is to work with shapefiles (with lat/lon data):
Sunday, June 03, 2007
Time animation
Too much time without write any post, but we continue working on the project (step by step).
Since the designed conceptual model allows associate periods of temporary validity to the objects, I was working on some kind of graphic interface to show the time information.
The idea is to allow every camera (or view window) to animate a period of time, for example, from 12:00 to 22:00. This period is animated step by step (being able to choose the step size: 60min, 3 sec, ...) showing those objects that are visible within the step, also called cursor.
Once we define the period of time to be animated by the camera and set the temporary validity for every interesting object, we can animate them. The information shown to the user is:

Since the designed conceptual model allows associate periods of temporary validity to the objects, I was working on some kind of graphic interface to show the time information.
The idea is to allow every camera (or view window) to animate a period of time, for example, from 12:00 to 22:00. This period is animated step by step (being able to choose the step size: 60min, 3 sec, ...) showing those objects that are visible within the step, also called cursor.
Once we define the period of time to be animated by the camera and set the temporary validity for every interesting object, we can animate them. The information shown to the user is:
- The period of time the camera is animating.
- The cursor initial and final time.
- A progress bar shown the position of the cursor within the camera animation period.
Wednesday, May 02, 2007
A bunch of screenshots
Every day the project needs more time, but every day I have less time to dedicate to it.
Anyway here present the latest screenshots.
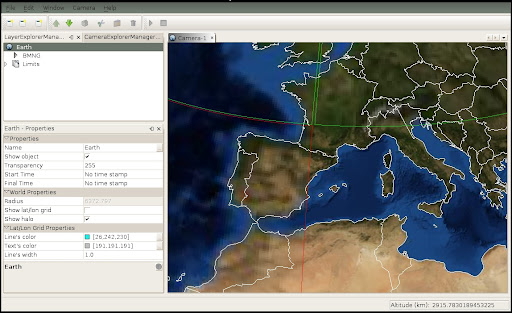
This image shows a one camera view: earth with one WMS layer (Blue Marble).

This one shows the first step to import a shapefile. The second step ask you for the attribute to be use as the name of the shapes. The file used here contains the limits of the world.

Next, you can see the earth with the imported shapefile data and how you can select and change on the fly the color and size of the points and polygons:

When you have WMS layers the tile's color brings you information about which tiles are loaded (no border), which are actually loading (green border) and which get some type of error while retrieving data (red border).
Next image shows a two diferent views (cameras) of the world. First camera shows the transport lines of the Barcelona city.
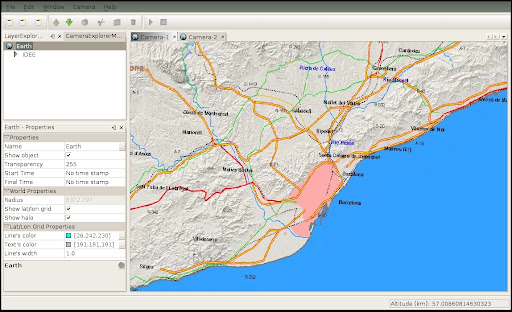
Second camera shows the transports for all Catalonia (Catalunya).

Here, we are going to import and geo-reference an image:
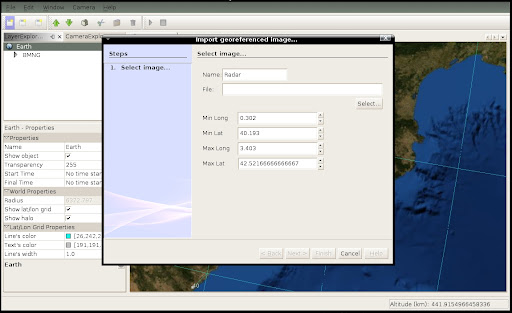
The transparency of the image has changed to see the underlaying Blue Marble layer:

Finally, here is a more complex combination of layers. At bottom the Blue Marble opaque layer. Over it a semi-transparent transport layer and on top of them the semi-transparent radar image.

Anyway here present the latest screenshots.
This image shows a one camera view: earth with one WMS layer (Blue Marble).
This one shows the first step to import a shapefile. The second step ask you for the attribute to be use as the name of the shapes. The file used here contains the limits of the world.
Next, you can see the earth with the imported shapefile data and how you can select and change on the fly the color and size of the points and polygons:
When you have WMS layers the tile's color brings you information about which tiles are loaded (no border), which are actually loading (green border) and which get some type of error while retrieving data (red border).
Next image shows a two diferent views (cameras) of the world. First camera shows the transport lines of the Barcelona city.
Second camera shows the transports for all Catalonia (Catalunya).
Here, we are going to import and geo-reference an image:
The transparency of the image has changed to see the underlaying Blue Marble layer:
Finally, here is a more complex combination of layers. At bottom the Blue Marble opaque layer. Over it a semi-transparent transport layer and on top of them the semi-transparent radar image.
Subscribe to:
Posts (Atom)

